2013 - Foundry Enemies


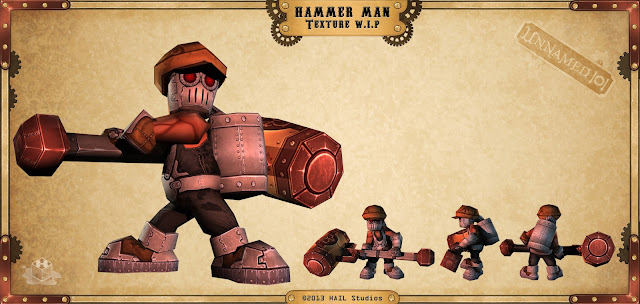
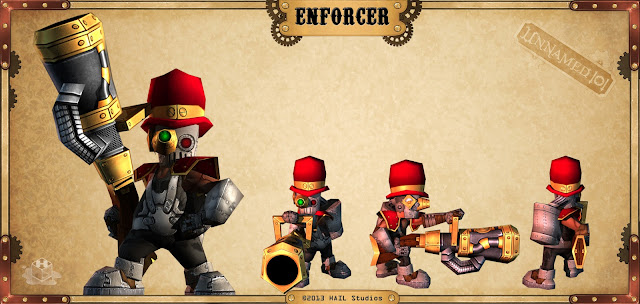
This are the three feature enemies the player will have to fight in the foundry level of our game. 

I used one unique base mesh, texture & rig for the main worker and then created each different dressing set for each enemy. 

This way I just have to import one skeletal mesh into UDK and have them all share the same AnimSet & AnimTree, then add the each dressing set using the socket editor. 
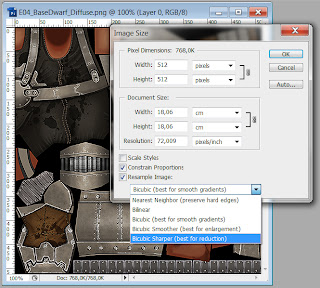

Photoshop re-sizing options
Textures are 100% hand painted and raw size of 2048 px then reduced to a 512 px using the Bicubic Sharper (best for reduction) option. PNG. I used two different maps, diffuse and normal map that is also used to simulate the specular inside the engine through specular per pixel option. By the way, the normal map is created through the NVidia NormalMapFilter plugin. 

Full Texture Map
Final poly count in tris:
  • Base Mesh: 552
  • Demo Man: 813
  • Hammer Man: 730
  • Enforcer: 894 
Rigging: 
  • Base Mesh : 17
  • TNT: 2
  • Hammer: 3
  • Blunderbuss: 2 

* Note : Joints are added to the weapons mostly to add the sockets from where the particles will then be attached. 


Subscribe to our Hail Channel for more updates on the game, characters and levels.

As always thanks for visiting.

2013 - Ask Me!

Hello everyone!

I'd like to share with you the article in which I'm featured. 

I was contacted by Brian O'Neill on behalf of the blog for the Gnomon Workshop.

He asked about my opinion on what do I think is the most difficult thing to learn when it comes to creating realistic anatomical designs? What muscle or bone grouping is the hardest to create?  What should new designers be aware of?

It was a honor for me to give my notes about the subject. Hope you enjoy reading.

Sincere thanks to Brian & Gnomon Workshop for this to happen! Apparently this was one of their most popular posts! :D

2013 - Enforcer Sneak


The Enforncer is the second of the three enemies the player will encounter in the Foundry Level.

Who are this guys? The foundry supervisors are there to repel potential uprisings from the hammer men. They use a massive blunderbuss that fires shotgun projectiles to keep them focused at doing their work.

Software: Maya 2012
Total Polycount : 930 Tris.
  • Base : 588
  • Blunderbuss : 190
  • Bowler Hat : 120
  • Shoulder Pads : 32
Textures : Coming soon! 
Rigging: 19 Bones
  • Body : 17
  • Blunderbuss : 2
Subscribe to our Hail Channel for more updates on the game, characters and levels.

As always thanks for visiting.

2013 - Hammer Man Sneak


Here is the new video I created for Hail Studios presenting the first sneak of the Hammer Man enemy I'm currently developing for the Unnamed 101 game. The first of the three enemies the player will encounter in the Foundry Level.

Who are this guys? They are the grunts of the foundry spending all day pounding steel with the power of a pressurized hydraulic system using a tank of compressed air on his back. This way the worker can exhort massive amounts of force with his giant hammer. 

Software: Maya 2012
Total Polycount : 770 Tris.
  • Base : 588
  • Hammer : 128
  • WorkMan Cap : 54
Textures : Coming soon! 
Rigging: 20 Bones
  • Body : 17
  • Hammer : 3
Subscribe to our Hail Channel for more updates on the game, characters and levels.

Thanks for visiting.

2012 - The Excavator Preview


One of the character boss's I created for our game Unnamed 101. The character is based on those giants machines called wheel excavator used to carve out mountains.

Software: Maya 2012 & Unreal Engine
Polycount : 6180 triangles
Textures : 512x512 / Diffuse, Specular, Normal Map
Rigging: 26 Bones

Suscribe to Hail Channel for more updates on the game, characters and levels.

Thanks.

2012 - First Steps : Unnamed 101


Unnamed 101 Game Alpha Preview.

As Lead CG Artist, In this process I was able to test how all pieces of the game will work together: static meshes, skeletal meshes, textures, animations, particles & lights. Plus define and polish the pipeline that we will be working with later. Great to find and solve problems.

Ex Problem: Oh no! Lights do not work correctly on static meshes!
Resolution: For this to work, models needed 2 UV Channels, one for the texture and the second for the lightmap to be produced. This can be exported from the modeling package and imported into UDK.

Suscribe to Hail Channel for more updates on the game, characters and levels.

Thanks.

2012 : The Ant Machines Preview


First upload of one of the monsters you will find in Unnamed 101, our main project at the moment, for which I'm currently working as Creative Director and Lead CG Artist.

Software: Maya 2012 & Unreal Engine
Polycount :684 triangles for the ant & 112 tris. for the bullet launcher
Textures : 512x512 / Diffuse, Specular, Normal Map
Rigging: 32 Bones
Animations: Idle/Walk/Attack/Defend/Active/Fire
Suscribe to Hail Channel for more updates on the game, characters and levels.

Thanks. 


2012 : Character Models for 3d Print


Character Models are ready for 3d Printing. This work is for a client who wanted to give a nice present to his girlfriend.
Base model and posing created in Maya. Details in Zbrush.
Printed model: 250k Poly
Printed Size: (cm) 15 x 6 x 6

Customer quote: "damn I spent months looking for a good modeler.. wish I'd tried you first!"
Feel free to contact me if you need any 3d Printing work to be done.

2012 - Male Character Model- For Sale!!


This is a low poly Character ready to use in videogames, originally created for a Virtual Mall.  Fully textured and rigged, ready to be animated. The model is fully quads with nice edge loops and animation friendly topology. Great base mesh for any artist to modify  or use as reference.
This model is for sale at Turbsquid for only 45$. Where you will find more details about the specifications of the character.
Formats: .ma , .max, .fbx, .obj,
Texture: 1024x1024 / Diffuse / Specular / Normal

2011 - Feature Film - Senior Character Modeler & Rigger


2011 - "The Wish Fish" feature film.

Responsible for modeling, uv layout, blend shapes & rigging for the main character, the kid Opil, Fisherman Captain Mackerel, his daughter Marina , and the yellow robots. I also had the great chance to supervise almost all of the modeling of props, environment and characters. I worked on this project full-time for 6 months in Balueko Animation Studios.

You will love the movie!